 Software Update Service
Configuring and Managing Fleets and Releases
The Administration Console is an easy-to-use web interface that allows you to organize and manage your device fleets and software releases.
Landing page
When authenticated, the user is directed to the landing page. The landing page contains the following components:
- Description
- System highlights
- Total endpoints for each release
Description
This area includes a short description of the tenant or customer in question.
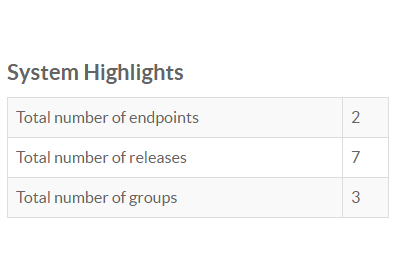
System highlights
System highlights include the following information for the tenant:
- Total number of endpoints
- Total number of releases
- Total number of groups
Total endpoints for each release
The bar chart here represents the number of endpoints on each release. The number of endpoints increments for a particular release only when the status of "Release Successfully Applied" is sent back to the server.

Campaign tracking
When you select Campaign Tracking, you are presented with a built-in dashboard that gives you information about the updates that are enabled in the system. You can use the dropdown menus at the top of the page to select releases in different categories.
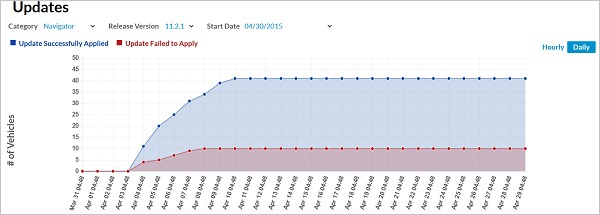
The main chart in the dashboard presents a historical view of the success and failure rates of the updates, giving you information about the overall uptake rate of the selected category. You can also click Hourly or Daily to see an hourly or daily view of the data.
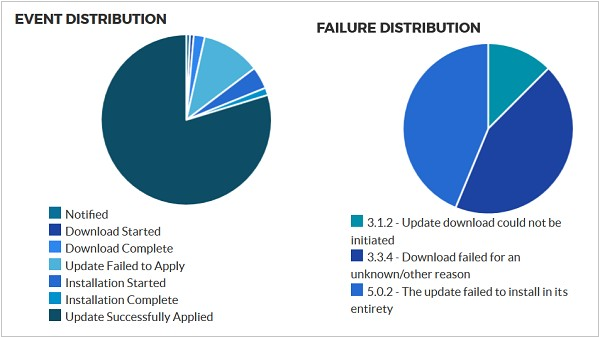
Two pie charts, also filtered by category, release version, and data, show the event and failure distribution of the selected release. These charts are dynamic and change depending on which milestones are reported by the endpoints. When you hover your mouse over the chart, a tool tip pops up to show the number of endpoints in the section.
The Event Distribution chart provides a snapshot of the update lifecycle for the fleet. It shows you the proportion of endpoints that have reached certain milestones in the lifecycle of the update.
The Failure Distribution chart shows the proportion of failures in each of the failure categories that have been provided by the fleet.
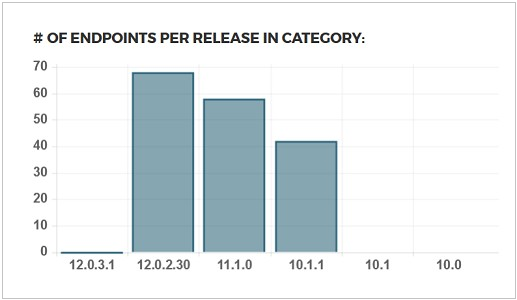
The # of Endpoints per Release in Category graph shows the distribution of the fleet across all of the releases that are in the release category.
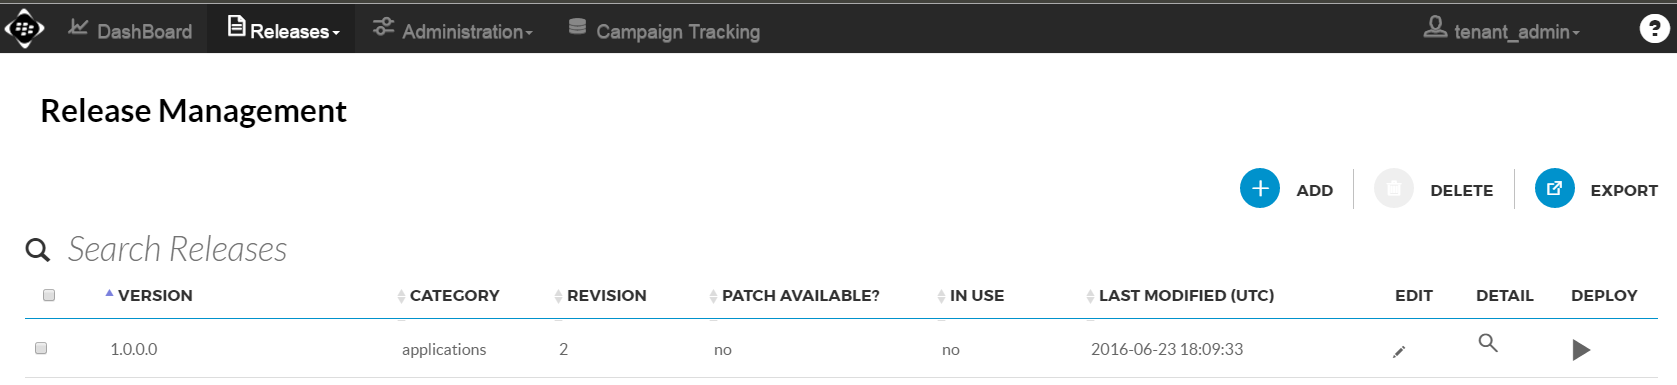
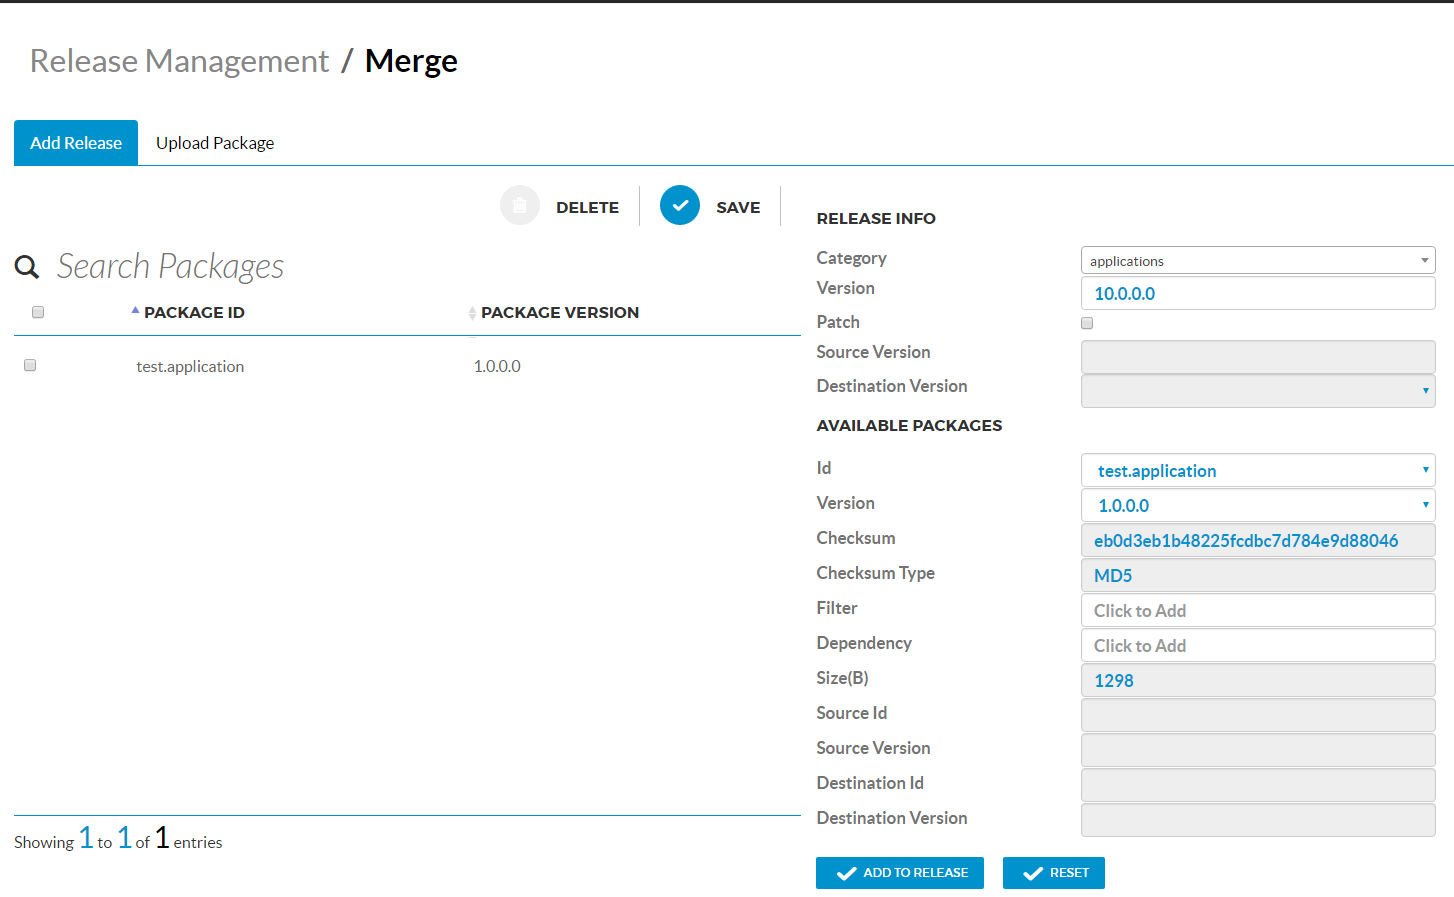
Managing releases
When creating a release, follow the following instructions.
Adding a new release
- From the Releases menu, click Release Management.
- Click
 to add a new release.
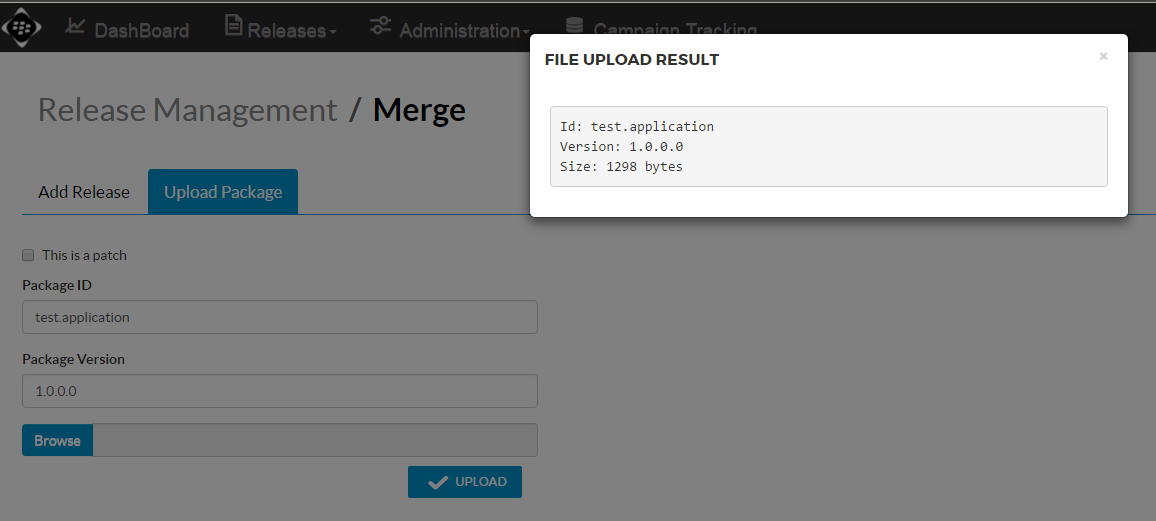
Uploading a package
To create a new release with a package that has not been uploaded, click on the Upload Package tab.
Uploading a full package
To upload a full package,
- Enter the following information:
- Package ID: The unique identifier for the package
- Package Version: The version number for the package
-
Click Browse and select the file to be uploaded from the file system.
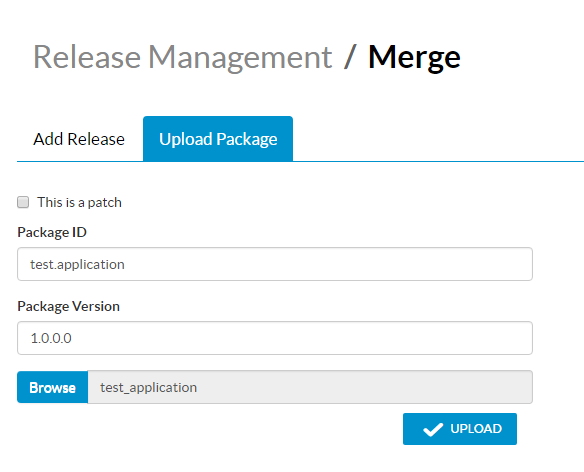
-
When the file is uploaded, a result window pops up.
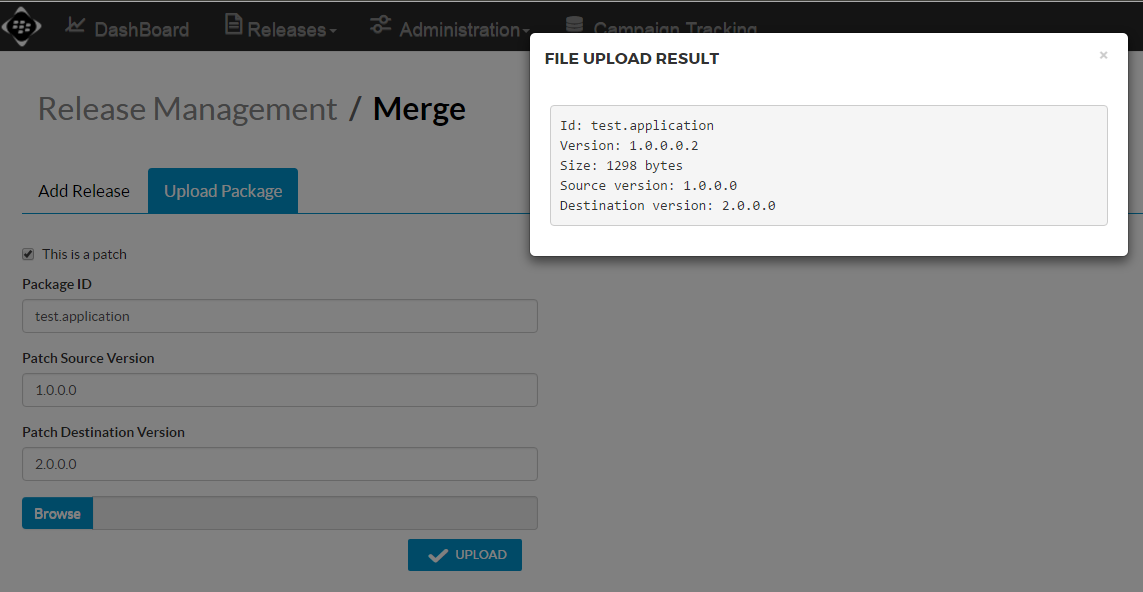
Uploading a patch package
To upload a patch package,
- Check the "This is a patch" box.
- Enter the following information:
- Package ID: The unique identifier for the package
- Patch Source Version: The source version of the patch
- Patch Destination Version: The destination version of the patch
-
Click Browse and select the file to be uploaded from the file system.

-
When the file is uploaded, a result window pops up.
Creating a release
After uploading necessary packages, you are ready to create a new release.

Creating a full release
A full release is a collection of full packages. To create a full resease, enter the following information:
- In the Catergory field, enter a new category or select an existing category.
- In the Version field, enter the version number.
- Select the packages that you want to associate with this release one by one.
Creating a patch release
To create a patch release, in addition to the above steps, do the following:
- Check the Patch box.
- In the Source Version field, enter the source version of the release.
- In the Destination Version field, enter the destination version of the release.

Managing dependencies
Dependency management allows the administrator to specify if a particular set of packages is required on the device before that release can be applied.
To add a dependency, click Add Dependency and add the criteria for the dependency in the format below. The "Package dependency examples" table below includes more examples.
packages matches(id="test.application" and version>=1.0.0.0)

Package dependency examples
| Description | Example |
|---|---|
| Simple expressions with left side always a key, right side always a value | colour=”red” and modelYear > 2000 |
| Type inferred and applied dynamically | model=”330” is different from model=330 |
| Property keys may be nested in a document | package.id |
| Comparison operators | >, <, >=, <=, = |
| Operators to check for values missing/null or present | model exists / warranty missing |
| IN operator for a short-hand to multiple equals | colour IN (“red”, “blue”, “green”) |
| Integer types, expressed either as decimal or hex | 5, 0x5 |
| Float type | 5.0 |
| String type (supports Unicode and escaping) | “red\r\n” |
| Version type | v10.1.0.1020 |
| Date type | 2013-07-04 |
| Time type (with optional timezone and seconds) | 12:00, 12:10:30Z, 12:10:30-07 |
| Datetime type (combines date/time) | 2013-07-04T12:10:30-07:30 |
| Support any combination of Boolean AND/OR combinations with parentheses to adjust priority | modelYear > 2000 and (version < v10.1.200 or hwid = 0x12345678) and dateval >= 2013-07-04 and (carrierId in (0x1, 0x5, 0x6) or colour=”red”) |
Managing groups
Devices can be categorized into groups, allowing for simplified rollout of updates for targeted endpoints. A group is defined using the parameters supplied by the endpoint's profile. For example, a parameter in an endpoint profile might be the date of manufacture of the device. You could then define a group that includes only those endpoints with a manufacture date of 2015.
Each endpoint can belong to a number of groups. These groups can define distinct or overlapping properties of different endpoint fleets, and can be used together or separately to manage updates. This means that an endpoint may be a candidate for multiple updates. For example, you might define groups for OS versions, configuration settings, applications, and so on.
Creating groups
To create a group:
- In Administration > Group Management, click Add.
- In the Add Group popup, fill in the name, criteria, parent group, and description for the new group.
- Click Add.
The new group appears in the list.
Updating groups
To update a group:
- In Administration > Group Management, select a group in the list by clicking on it. The group information appears on the right of the screen.
- Edit the group information as appropriate.
- Click Save.
Finding groups
To find a group, simply type the search criteria into the Search Groups field. The list is automatically filtered based on the search terms you enter.
Managing users and roles
You can create users and roles to control access to the administrative functions and releases for your organization. Roles allow you to collect permissions into logical groupings that you can apply all at once. For example, an administrator role would typically have permission to view, add, update, and delete users, roles, groups, and so on. However, an end-user role might only have permissions to view certain data, with no permission to modify it.
By default, the TENANT_ADMIN role exists for a new tenant. This role has full permission to read and modify any other roles (but not its own).
You can create custom roles to define the sets of permissions you need for your organization.
Creating roles
To create a role:
- From the top menu, select Administration > User and Role Management.
- Select the Role Management tab.
- Click Add. A new role appears in the list of roles on the left of the screen.
- Type a name for the new role.
- Select the appropriate permissions from the list of permission on the right of the screen.
- Click Save.
The new role appears in the list.
Creating users
To create a user:
- From the top menu, select Administration > User and Role Management.
- Select the User Management tab.
- Click the Add button.
- Under User Settings, type the new user name, select a primary group, and assign a role.
- Type and confirm the user's password.
- Click Save.
The new user appears in the list on the left. You can scroll through the list to find the user you just added.
Searching for administration events
In the Administration Log (Administration > Administration Log), you can review the administrative events that have occurred. You can filter events by date and search events by any keyword.
To filter events by date, simply enter dates in the StartDate and EndDate fields. The list of events is updated automatically. To clear the date fields, simply delete the date text.
To search by keyword, type the search term in the Search Events field. For example, you can search for a user ID, event name, or part of a description (for example, "added"). The list of events is updated automatically.
Searching for device events
You can review and search for device events in Administration > Diagnostics and Events.
To filter device events by date, simply enter dates in the StartDate and EndDate fields. The list of events is updated automatically. To clear the date fields, simply delete the date text.
To search by keyword, type the search term in the Search Events field. For example, you can search for a device ID (or part of the ID), event name, or part of a description (for example, "added"). The list of events is updated automatically.